2017-02-07
I’ve been seeing so many mouse droids recently, that I decided to look into it. Bryan M. and Erich S. both from the New England Garrison have been gracious enough to show me the guts of their droids.
This is a mouse droid from one of the movies. They basically just lead a bunch of troopers through a hallway.

From the Star Wars wiki
The MSE-6-series repair droid, sometimes referred to as the mouse droid, was a small, box-shaped, wheeled general purpose MSE-series droid often used for delivery and maintenance purposes. MSE-6 units were most notably on Star Destroyers and both Death Stars during the time of the Galactic Empire.
This is one of the new Disney RC toys that just came out earlier in 2017. It’s not full scale, otherwise I would have just bought that.

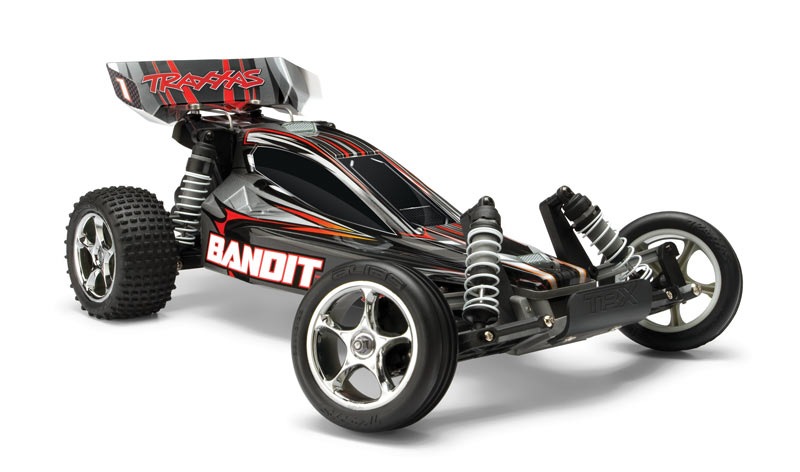
The mouse droid doesn’t look like such a difficult build as the internal drive mechanism is basically taken right from an RC car, specifically the Traxxas Bandit. The chassis from the Bandit fits perfectly in the body of the Mouse Droid shell, with ALOT of room to spare.
Build Options
1. The easy route to building this would be to just buy the shell from Granite Earth, but they are always out of stock. It’s $60 and would be super simple to disassemble the Slash, cut holes in the shell and screw the Slash guts in. BUT, I can’t get it.
2. Another option that I was debating was to create a wooden buck for local armorers to vacuum form. The buck is just a 3D trapezoid on top, and a shallow 3D trapezoid on the bottom. This should take about 4 hours to make out of wood. BUT, because the longest length is 22 inches, and of the vacuum formers in the area, 1 is too small at 18 inches max length, and the other one is in a snow covered barn. I may ask one of my friends in Connecticut if they have a vacuum former big enough. Who knows……
3. Another option for this build is to print each of the pieces on a 3D printer. It would take forever though, and it may be smarter to just cut the pieces out of styrene or ABS and glue them together.
4. I may even try this out of Harbor Freight foam. 🙂
Research
So when I start a build, I start looking for as many specs, dimensions, reference pics, etc. When I get them, I will post them here.
Paul Murphy, a local R2 builder, and an admin on the Mouse Droid Builders Club on Facebook gave me these specs.

Guts of someone’s mouse droid. So much space.
Paul also made the top greeblies and rear wheels and posted them on thingiverse.
http://www.thingiverse.com/thing:1862673
http://www.thingiverse.com/thing:1862699
Full mouse droid on thingiverse.
http://www.thingiverse.com/thing:916594
Yahoo Group
https://beta.groups.yahoo.com/neo/groups/Mouse_Droid_Builders/info
Reference Pics
https://goo.gl/photos/eTAP1FoxuRjgyVC98


2017-02-19
Since I couldn’t get the granite earth shell, I decided to start building the shell from scratch. I had some left over HIPS, about 2’x6′ pieces that Chistina Durett gave me about 5 years ago, that I’ve been holding on to for a rainy day.
Using the drawings and dimensions provided by Paul, I measured and cut out all the pieces using a straight edge and a razor. HIPS is really easy to cut. You just have to score it once, and recut it once or twice and then snap it. Super easy.
Once the pieces were cut, I taped them together using masking tape, and then glued using hot glue. Getting the alignment was tough as some of the pieces were flimsy/floppy. I added some additional scrap to the back of the long pieces to give it some rigidity.
I also bought 2 pieces of 2x2x0.25″ MDF that I’m going to use as the base. Cut those to length and will eventually glue the HIPS to that.
Test fit using my Redcat Twister XD, which I’ve had for about 4 years or so. Seems to fit OK. Just have to cut the wheel wells out and fit. Here are some build pics:


Someone on the Mouse Droid Facebook page asked to see this. It shows how flexible the Ninjaflex top greeblie is. I thought I’d make this greeblie in TPU because I’ve heard others stating that it broke when they flipped or crashed. This is a solution that drone builders use to minimize broken parts. Use flexible parts that can absorb the impact.
2017.02.27
I did some more building on the mouse droid last week. All of the greeblies are printed.
The shell is completely glued together, and I started test fitting the RedCat Twister to the shell. Here you can see a few pics with all of the parts rough fit.


2017-03-10
So I got some work done over the past week or so.
I was able to cut the bottom portion of the shell to fit the buggy chassis in the shell. The wheel cut outs are not standard or canon, but I didn’t want to replace the wheels on the buggy. I don’t think anyone will care. I had to also drill some holes in the perimeter of the chassis outline so I could zip tie it to the bottom shell. The top of the shell had to have cutouts because I made the perimeter too wide. You can see that I had to cut it to give clearance for the wheels to turn.


Once I got the buggy to fit in the shell, I had to cut 1/2 inch strips to finish off the edges. They were cut, sanded, and glued using crazy glue to the edges.


To create the 1/2 inch spacing between the top shell and the bottom shell, I cut out strips of 1/2 inch ply wood and fit them into the shell. These will eventually be painted black. they are hard to see since they are recessed, so I didn’t have to finish them with plastic or bondo.

Final, unpainted shell.

Painted with Rustoleum black satin. Not sure if that’s correct, but it’s what I had in the house.

Droid army cadet!

First test drive
I also got a bluetooth speaker, 5 watts for the speaker. It’s a Bolse 5W portable speaker. It was only $14.99.
https://www.amazon.com/gp/product/B00M7D93Q0/ref=oh_aui_detailpage_o02_s00?ie=UTF8&psc=1
Installed a small HIPS box attached to the roof of the droid so the sound would be easily heard.


I added velcro to the front and back of the droid on the wooden parts to hold the top and bottom together. Not sure if this will be the final configuration, but it’s good enough for now.
Assembled the top greeblies using some extra RC parts I had. The top greeblies are hot glued into place and the assembly is held together with the bent screw shaft. Punched 4 holes to get the screws to go into the droid top shell, so the bottom plate could sit flush. It’s just hot glued to the inside of the droid.


Final assembly

I finished installing all of the greeblies on the droid. Here are the final pix:


Here’s an FPV video of it using a GoPro.
Another video of it in operation
I’m debating adding an FPV camera and transmitter to this. It would work by drilling 2 small holes in the top near the top, front greeblies and adding a camera. I could also add a GoPro to get some HD shots. We’ll see.