I decided to build a Chopper droid because of 2 things:
- I have a boat named Chopper, so wouldn’t it be cool to have a Chopper Droid on it?
- My wife and daughter both watched Star Wars Rebels more than me, so I built it for them and
- (which I just thought of) A 3D printed droid is much lighter to load into the car vs a fully aluminum droid.
So, using the files I got from Tiny P on Astromech.net & Protoprops on Thingiverse, and with alot of inspiration from the Chopper Builders Group on the Facebook, I started my first prints of the dome.
- Links
Star Wars Rebels: Chopper Facebook Link
Tiny P’s files on Astromech.net
ProtoProps Body – Thingiverse
July 2017
I started in July 2017 by printing the dome pieces. Tiny P had uploaded all of the pieces on Astromech, so I downloaded all of them and started printing them on my Taz 5 printer. I think in total there are 24 pieces to assemble the dome. There are two vertical layers and four quarter pieces on the top. All the parts were epoxied together using Loctite 2 part 5 minute epoxy. I used this epoxy throughout the build as it seemed like it could do the job. I think I tried using a 3d print pen to weld the parts together, but I didn’t have good luck doing this.


While I was assembling the dome, I was printing all of the pieces to the body/frame. The parts were from ProtoProps on Thingiverse. It was fairly easy to print, but the marks on the pieces were really difficult to layout and assemble. It was really easy to mix up the parts since they weren’t marked. After staring at a small pic on the thingiverse gallery, I finally got the pieces laid out in the correct way. They were taped together with masking tape for a quick fitting.


You could also see that I used bondo to fill any gaps that were left behind on the dome. Like always, I let the bondo sit overnight, then sand it the following day.


The dome top needed some support at the top, so I used double stranded packing tape, which I also use for foam airplanes, to ensure a strong bond. I may eventually add more support as it still flexes a little bit.
September 2017
Once the frame was made, I somehow got into Tiny P’s beta group for the legs. He wasn’t posting the final files online, but he said that if we were at the point that we needed legs, he would provide us access to the files. I got all of the files and everything worked really well. Like the previous parts, the legs were printed, fit with painters tape, then glued with epoxy, bondo’d, sanded and painted.


Better get painting!!!! It’s getting cold soon!
So many people in New England know that by October, the temperature outside can be below 40-50 degrees Fahrenheit. I don’t necessarily care about the cold, but I do care that spray paint does not like to dry correctly in cold weather. So it was a mad rush to get all of the parts printed and painted so I could get this guy assembled. All the parts were printed, bondo’d and painted by the end of September 2017. I was finally able to get a picture of the complete droid and the correct height, next to my R5.


The center arm slot was had to be printed twice. The first time I tried to install it, the whole thing cracked. I think it was because I glued the 3 pieces together with tension between the parts so they were misaligned when I installed them on the droid.

The pictures online of Chopper are not very clear. I thought at one point that I needed silver as the dome ring. I had tape on the droid to give it a shiny look, but after looking closely at some of the pics, it was white or beige. I chose to go with white and pulled the aluminum tape off.

Here’s the picture of him assembled at full height without the front caster. The bolts that were recommended weren’t large enough, so I ordered longer ones.


November 2017
After a bit of a break building Chopper, I had to do a lot of research about making the drive train. Since Chopper was fairly new to the droid builders, there wasn’t an “off-the-shelf” mount that I could buy to install the scooter motors. I saw someone had built them out of aluminum square bar, so I bought some from McMaster Carr and tried it. The pieces were 3 inches by 4 inches and about 1 foot long purchased. I measured the motor mounts and drilled holes into the aluminum bar to make the bracket. It came out pretty good!!!! In any droid build, making the motor mounts is probably the hardest thing to do because it has to be perfect.


I used a technique I learned while reading the book “The Martian” to cut the main hole in the aluminum bar. Save so much time!!!!


The motors and wheels are standard E100 scooter motors with a 25# chain on them.
The front caster is a 6 1/4 inch caster from Grizzly.com.
It’s called a Steelex – 6-1/4″ Black Rubber Swivel Caster, Threaded caster.
December 2017
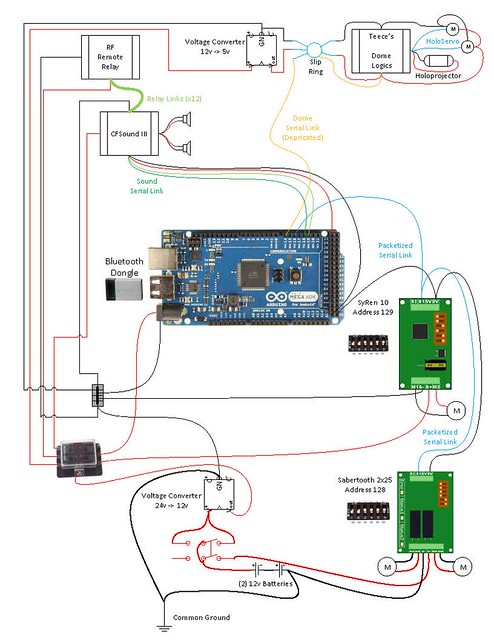
Once I got the motors mounted, I installed all of the other electronics. I’m using the SHADOW system that I used in my R5 that uses an Arduino MEGA, an MP3 player, Syren 10 motor controller for the dome, Sabertooth 25 motor controller for the legs. There’s also a marine power distributor, a 12 -> 5V step down to charge a portable battery that I use as a capacitor for clean power to the Arduino. To make an ironic joke, I mounted all of the electronics on a “Chopping” board made out of plastic. Hahahahah right?
Here’s the link to the SHADOW setup.
SHADOW WIKI on Astromech
Here’s a video showing all of the parts, but gives alot of detail on the sound system.
Video of the dome test.
I also made the power switch accessible from the outside in case Chopper decides to take off. It uses a 25 A circuit breaker as it’s main switch and it’s hidden on the back vent ports. There’s also a charging port installed, but I don’t use it.


More pics of the audio system install.


Choppers First Steps
Choppers Sound Bank
Pictures of Chopper before weathering


My birthday present
I finished up painting and weathering Chopper on my birthday! Work was so terrible this year that I decided to really give me something special on my birthday, so I worked really hard to finish him up. Now we have the same birthday!!!!


This is how many rolls of filament it took to make Chopper. I saved them just for this picture.

Here’s Chopper with the rest of his droid family.

And with my daughter Jasmine!

To see all of these pictures and more, check out this gallery on my photosite.
https://luckyxero.smugmug.com/Luckyxero-Website/Chopper-Build/
Onto the next one!